Showing posts with label Tutorial. Show all posts

Friday, March 2, 2012

CTMH - Doorknob hanger with Art Philosophy - a tutorial

You may have seen me say that I love the Art Philosophy collection, once or twice, or maybe more like 20 times!  But really I do.  Today, I'm sharing with you one of the reasons that I love it so - a doorknob hanger.  This cartridge makes it so easy and quick to make beautiful items! 

First, I cut the Lagoon cardstock at 11 1/2" using the following buttons (Shift/font layer):

When it is finished cutting, it looks like this:

Simply fold along the score lines so that it looks like this:

Adhere the folds to the back of the hanger, add a 3"x 3 1/4" piece of patterned paper (I used Stella).  Then I decorated it by creating a mini pom-pom using sunset Baker's Twine from the Paradise assorment and stamped the heart from A1123 - Adore with Tulip ink on Colonial White cardstock.  I cut out the heart, and popped it with foam tape.  Now, I have a cute little piece to hold a pen and post-it notes right by the phone!


March is a great time to become a consultant! You can get the Art Philosophy collection (or $100 in Select Product Credit) free when you join my team! If you need more information - click on the tab "Join my team in March"!

Tuesday, December 20, 2011

CTMH - Another Christmas card with Art Philosophy and cutting instructions, too!

This card was quick and easy!  And that's a good thing, since I'm WAY behind on getting the Christmas cards out this year.  As long as they're postmarked by Friday, I'm fine - right? 

Set your Cricut to 5 1/2", then select the buttons below - "CARD" and the 8th button from the left in the fourth row.  Load the Sweet Leaf cardstock, then cut.  This is your card base.


Other dimensions (Using a paper trimmer)
Plaid: 3" x 5 1/2"
Stripe: 1/2" x 5 1/2"
Holiday Red: 3/4" x 5 1/2"
Topiary: 2"x 3 3/4"
White Daisy:  1 1/2" x 3 1/2"

I lightly inked the edges of the card front in Topiary, and added Red Glitz for the holly berries. 
Supplies used:
Art Philosophy collection (I have a SPECIAL PRICE on it through 12/24!)
Believe paper packet
Stamp set: D1492 Christmas Love
Topiary Ink
Red Glitz Glitter Gel
Corner Rounder

Tuesday, November 30, 2010

December Stamp of the Month - Amore

Welcome to the DecemberStamp of the Month blog hop!

This month we are featuring D1444 - "Amore" which is a set of 13 stamps. I love this stamp set; the filigree heart is beautiful!


If you have come here from Lori's blog, you are on the right path!

This month, we have 60+ Close To My Heart Consultants sharing their creations using December's SOTM and other great CTMH products on their blogs. This is simple to do - just click on the link at the end of the post on each blog to move to the next one! Here we go! 


I decided to create a stamped candle this month.  Supplies used - Sky Blue Ink, Pacifica Ink, tissue paper, wax paper and a candle.
I've included a tutorial at the end of the post; scroll down to see how to create stamped candles.


Now "Hop" on over to Shirley's blog to see her work! Be sure to visit all the Consultants at their Blogs to get some great crafting ideas and other fun ideas! Don't forget, this stamp is only available from December 1- December 31, 2010. Be sure to visit all the Consultants at their Blogs to get some great crafting ideas and other fun ideas! Contact your CTMH Consultant (or click here) to see how you can get this stamp set at a discount or even free! 

Tutorial 
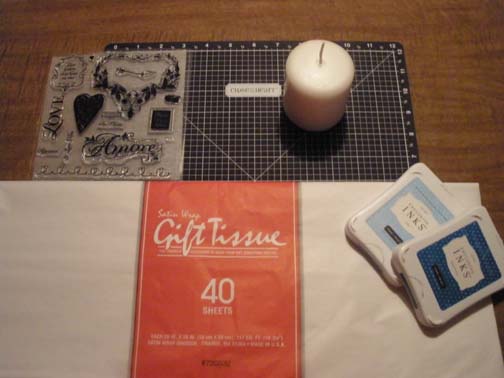
  • Gather your supplies: stamp, inks, tissue paper, scissors, candle, wax paper and heat gun.
  • Stamp on the tissue paper. Make sure your tissue paper has no wrinkles in it. I stamped the heart in Sky Blue and the sentiment in Pacifica.


  • Trim the image as close as possible on the tissue paper.


  •  Lay the image on the candle.  Make sure again that there are no wrinkles.
 
 
  • Cover the stamped image with wax paper or parchment paper.  Heat with a heat gun until the tissue paper adheres to the candle.
  • Remove the wax paper/parchment paper and you have a stamped candle!


Bookmark and Share

Monday, October 26, 2009

CTMH - Using watercolor pencils

I love our watercolor pencils.  They match the colors in our papers, and with a little shading and a blender pen, you can lighten or darken the color.  For some reason, when I mention them, friends think that they need to be artists to use them.  (I believe that anyone can be an artist - but that's a topic for another day).  So, I want to show you how easy and fool proof they can be!

Step 1:  Stamp your image.  I used My Acrylix stamp set B1330 -  Surprise.  

Normally, I would stamp and emboss, but in the interest of time, I used a quick-drying pigment ink.  

Step 2: I knew that I wanted lighter shading in my finished piece, so I colored just within the inside of the lines (but did not entirely color any one section):
 
 
Step 3: Using the blending pen, I pulled the color from the outside by the lines to the interior of the design.  I did this with each color.  I used the same blender pen, using scratch paper between colors to ensure that I didn't bleed my colors together.  (You could also use a water brush here, but my preference is the blender pen.)


Finally, I cut the image down to size and used it on a card.  Today, I sent it to one of my best friends! 
For the card, I also used Sweet Pea Level 2 papers and Blush ribbon rounds.

Bookmark and Share

Friday, October 2, 2009

CTMH Happy Halloween Card- Beware stamp set and a Tutorial

As soon as I saw Beware (D1381), I knew EXACTLY what I wanted to do with the Happy Halloween sentiment!  To me, the "circle" around the words and bat looks like a full moon.  So I used the shadow stamping technique to achieve the look I wanted!

Step 1: I flipped the stamp onto the "wrong side" and inked it using Autumn Terracotta ink.  I didn't want it quite so dark, so I used 2nd generation stamping (stamping on scratch paper first, then stamping the image) to remove some of the ink.


Step 2: Then I flipped the stamp back over, and used Black Ink for the image.


This is how the image looked - exactly as I'd imagined it! You can see the difference that second generation stamping made when you compare it to the first image on scratch paper.


Bookmark and Share

LinkWithin

Related Posts with Thumbnails