Showing posts with label Great gifts. Show all posts

Wednesday, December 14, 2011

CTMH - Are you looking for a cute way to present a small gift?

I love how easy it is to use the Art Philosophy cartridge to make quick and easy gifts/enclosures!  Today, I'm going to share with you how I made this simple tag card turned into a gift pocket.


Here are the step by step instructions:
Paper Packet: Believe
Ink: Topiary
Tools: Trimmer and Corner Rounder

Step 1 - Set Cricut to 5 1/4", and load Holiday Red cardstock.  Select Card - and the tag image all the way to the right.


Step 2: When the base is cut, add 1/8" double sided tape to the left and bottom.  Close tag, and you've created a pocket.


Step 3: Cut 4"x4" square from Topiary cardstock with your trimmer, then round the corners.

Step 4: Set Cricut to 3 3/4". Cut plaid piece as follows - 2nd row, 4th from the left.


Step 5: Layer the plaid piece onto the topiary piece.


Step 6: Add White Daisy grosgrain ribbon to the center of the piece above.


Step 7: Set Cricut to 1 1/4".  Load Sweet leaf cardstock.  Select 3rd row down, 6th button from left.


Step 8: Stamp image in Topiary ink.


Step 9: Add stamped image to top of ribbon.


Step 10:  Add this piece to the front of the tag card.


I then used tulle and curling ribbon to wrap the small item I'm placing in the card.  It's fun and festive, yet very easy to make!  Here's another look at the finished product - all ready to give to the recipient:


Saturday, November 19, 2011

CTMH - Another envelope mini album

As I said yesterday, I'm in love with these mini albums - so easy to make and so cute when finished!  For this one, I used our 6"x6" Kraft envelopes (from our Kraft Die Cut Cards - will have a separate post on what I did with the cards!).  I used the Art Philosophy cartridge to cut all of the shapes on this mini album.

Cover

Pages 1 and 2

Page 2 with pull out shown

Pages 3 and 4 with pull outs shown

Pages 5 and 6 with pull out shown

Pages 7 and 8 with pull out shown

Pages 7 and 8 with pull outs tucked into the envelopes

Back Cover
For this mini album, I used Kraft Die Cut Cards and Envelopes, Roxie Paper Packet, Love Life My Acrylix Stamps, Ink - Tulip, Tulip Ribbon, Antiqued Copper Designer Brads, Sparkles, Cricut Art Philosophy Cartridge, and Kraft cardstock.


Friday, November 18, 2011

CTMH - Envelope Mini Album

I love bite size projects - you know, the kind where you can work on it in bits and pieces then put it all together.  Envelope mini albums are perfect bite size projects, and I've been working on them like crazy these past few weeks.  I'll start with the most recent:

Cover

Inside - pages 1 and 2

Inside pages 3 and 4

Inside pages 5 and 6, along with the envelope tag pulled out

Inside Pages 7 and 8

Inside pages 9 and 10

Inside pages 11 and 12


View of back spine of album
I used regular "personal" envelopes (5) of them for this project.  I also used the Believe paper packet and the Holiday Wishes stamp set and Tag the Occasion stamp set along with Topiary ink, Desert Sand ink for distressing edges, shapes from the Cricut Art Philosophy cartridge, white grosgrain ribbon and Red Glitz Glitter Gel.
 

Tuesday, November 30, 2010

December Stamp of the Month - Amore

Welcome to the DecemberStamp of the Month blog hop!

This month we are featuring D1444 - "Amore" which is a set of 13 stamps. I love this stamp set; the filigree heart is beautiful!


If you have come here from Lori's blog, you are on the right path!

This month, we have 60+ Close To My Heart Consultants sharing their creations using December's SOTM and other great CTMH products on their blogs. This is simple to do - just click on the link at the end of the post on each blog to move to the next one! Here we go! 


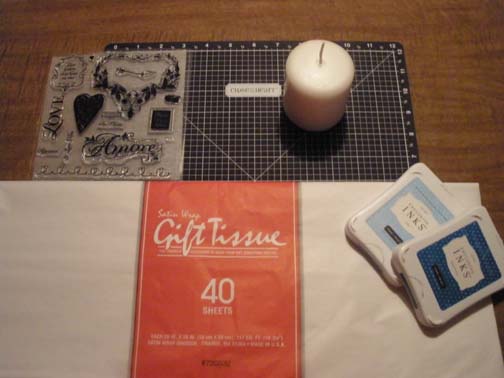
I decided to create a stamped candle this month.  Supplies used - Sky Blue Ink, Pacifica Ink, tissue paper, wax paper and a candle.
I've included a tutorial at the end of the post; scroll down to see how to create stamped candles.


Now "Hop" on over to Shirley's blog to see her work! Be sure to visit all the Consultants at their Blogs to get some great crafting ideas and other fun ideas! Don't forget, this stamp is only available from December 1- December 31, 2010. Be sure to visit all the Consultants at their Blogs to get some great crafting ideas and other fun ideas! Contact your CTMH Consultant (or click here) to see how you can get this stamp set at a discount or even free! 

Tutorial 
  • Gather your supplies: stamp, inks, tissue paper, scissors, candle, wax paper and heat gun.
  • Stamp on the tissue paper. Make sure your tissue paper has no wrinkles in it. I stamped the heart in Sky Blue and the sentiment in Pacifica.


  • Trim the image as close as possible on the tissue paper.


  •  Lay the image on the candle.  Make sure again that there are no wrinkles.
 
 
  • Cover the stamped image with wax paper or parchment paper.  Heat with a heat gun until the tissue paper adheres to the candle.
  • Remove the wax paper/parchment paper and you have a stamped candle!


Bookmark and Share

Tuesday, May 4, 2010

CTMH - Mother's Day Card/Gift for a friend

I created this Mother's Day card and little matchbook post it holder for one of my friends.


It was really simple to create both of these items!  For the note holder, I used heavenly blue cardstock for the base (3.125" x 9.5").  I scored it at 3.325", 3.75" and 7.75".  I then added ribbon at the bottom, and added patterned paper (Splendor Level 2).  The stamp is from "A Flitter", stamped in Goldrush.  I then used liquid glass around the edges, the middle, and the antennae of the butterfly.  At the edges of her antennae, I added bitty sparkles


The card is 3"x3".  I used the fabulous new circle punch to create the flower as shown in the idea book.  Again, the paper is Splendor. 

Bookmark and Share

Sunday, October 11, 2009

CTMH - Make your own card box/holder

I love to make cards for gifts, but finding a way to present them can be a challenge!  I came up with this template to create a little gift box/holder to make when I'm giving cards as a gift.


Step 1: Cut a piece of cardstock - 7.75"x12".  I used Chocolate cardstock.  Lengthwise, score at 1".  Then flip it over and score 1" lengthwise on the other side.

Then, turn the paper on it's side.  Score at 1.5", 2.5", 7" and 8".  Cut the areas indicated on the template.


Another view - to see the score lines better:


Step 2: I sewed crystal blue buttons on the top and bottom using Chocolate embroidery floss.


Step 3: I then cut a piece of patterned paper to 5.625"x12".  I used Caprice Level 2 papers. I scored it at 1.5", 2.5", 7" and 8".  I cut 1/4" off the top and bottom so the final piece measures 4 5/8"x12".


Step 4:  I used the piece above to create a liner for the box:


Step 5: I tied Crystal Blue waxy flax on the top button, and can use that as a closure for the box by wrapping it around the top button, then the bottom button in a figure 8.


Step 6:  Decorate the box. I will post photos of that tomorrow. 
You can download the template for the cardholder here

If you have a large format printer, you can select 13x19 paper and no scaling.  It will print to actual size, if you wish. 

If you just want the measurements, choose to print on regular paper and scale to paper size.

Bookmark and Share

LinkWithin

Related Posts with Thumbnails